
3C015
|
Installation and Configuration Instructions for 3Com DynamicAccess® Software, Version 1.5 |
12/16/98
| These instructions are intended for network administrators who have
experience installing software and using management tools for an Ethernet network. |
This software release is version
1.5.4a and the following changes were made:
In the software release 1.5.2, the following changes were made:
In the software release 1.5.1, the following changes were made:
|
| To
avoid multiprocessor system failure with Windows NT 4.0 Service Pack 4: You
must install a Microsoft TCP/IP hotfix patch and reboot the PC before installing DynamicAccess
software version 1.5 on the multiprocessor PC. If this hotfix is not present when
start the installation of DynamicAccess software version 1.5, the setup program
aborts. If you install DynamicAccess software version 1.5 and then upgrade to Service Pack 4, you must install the patch before you reboot the system. A link to the Microsoft TCP/IP hotfix patch is available at the following 3Com web site: www.3com.com/dynamicaccesss/hotfixes |
The following procedures describe extracting the 3Com® DynamicAccess® software release 1.5 on a PC running Windows 95 or Windows NT. To extract the DynamicAccess software files:
- DA15SW which contains all the software files you need
- INSTALLATION which contains the installation instructions, starting with Instructions.html
Follow these instructions to install your DynamicAccess software.
These client requirements are the minimum suggested for running DynamicAccess software version 1.5.
Additional requirements for your network or end nodes according to the DynamicAccess software features you want to implement are outlined in this table.
| DynamicAccess Focus | Feature | Standards | Network Requirements | NIC Requirements | Protocol Requirements |
|---|---|---|---|---|---|
| Client | dRMON | RMON | For the Edge Monitor: Windows NT Workstation or Server, version 3.51 or 4.0 with proper Service Packs | 3Com Ethernet/Fast Ethernet NICs | None |
| General network |
Fast IP | NHRP, 802.1p/Q | Layer 2 switched path between end nodes on separate subnets, with central router between IP subnets | At least NDIS 3-compliant Ethernet/Fast Ethernet NICs | TCP/IP |
| Traffic Prioritization | 802.1p, PACE RFC, IP ToS |
IEEE 802.1p or switches enabled with PACE™ technology |
3Com Ethernet/Fast Ethernet NICs | IP or IPX | |
| Efficient Multicast Control | 802.1p, GMRP |
IEEE 802.1p GMRP switches |
At least NDIS 3-compliant Ethernet/Fast Ethernet NICs | None |
For maximum performance and reliability when you run DynamicAccess software, 3Com
strongly recommends that the latest Microsoft Service Pack for that operating system be
installed on any computer on which you plan to install DynamicAccess
software. The Service Pack levels that were current at the time of product release
are as follows:
3Com recommends that as a minimum, you have installed the Service Pack levels listed above on your computers.
To determine whether you have Windows 95 OSR2 or Windows 95 with Service Pack 1, right-click the My Computer icon and select Properties. In the General tab, the notation 4.00.950 B indicates that the OSR2 release of Windows 95 is installed. The notation 4.00.950a indicates that Service Pack 1 for Windows 95 is installed.
To determine the Service Pack level for Windows NT, check the displayed Service Pack level on the boot screen. Or, open the Control Panel and select About Windows NT from the Help menu.
Check Microsoft’s World Wide Web page for the most current Service Pack at http://www.microsoft.com.
ATM Environments
DynamicAccess software version 1.5 does not bind to ATM NICs even though they emulate Ethernet. If you have a PC with an ATM NIC and an Ethernet NIC, DynamicAccess software binds only to the Ethernet NIC.
Intermediate Drivers
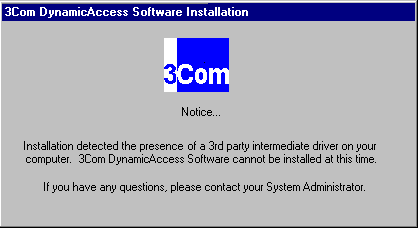
If a PC already has an intermediate driver installed, the DynamicAccess installation software detects its presence and aborts the installation process. The following message is displayed:
Dial-Up Adapter
DynamicAccess software version 1.5 does not bind to the Microsoft Dial-up Adapter, if present in the Network Control Panel icon. Only physical adapters can have the DynamicAccess software bindings.
Windows 98
When upgrading a PC to Windows 98 from OSR2 or Windows 95 and DynamicAccess software has already been installed, 3Com recommends that you first remove the DynamicAccess software, complete the upgrade, and then reinstall the DynamicAccess software.
Using DMI agents on Windows NT 3.51
DynamicAccess software installs properly on a PC with Windows NT 3.51 that already has a DMI agent installed. However, when activated, the DMI agent posts a Dr. Watson error that sites the LAN_AC32.EXE file and previously seen NIC attributes are no longer visible in the management console. Be sure to go to 3Com's Web site to find DMI agent updates if you use or plan to use DMI agents at http://www.3com.com/managedPC.
DynamicAccess software adds intelligence to 3Com and some non-3Com NICs for improved performance, management, and control of your network. DynamicAccess software 1.5 is a single piece of software, or an "advanced network driver," that integrates dRMON, Fast IP, Traffic Prioritization, and Efficient Multicast Control support. The DynamicAccess software release 1.5 components are:
| Feature | Benefit |
|---|---|
| Distributed RMON (dRMON) | Enables full RMON reporting on all network segments, even in switched networks, without sacrificing performance and without needing to place dedicated RMON probes throughout the network. |
| Traffic Prioritization (using IEEE 802.1p Class of Service [CoS], IP Type of Service [ToS] and PACE technology) |
Provides a standards-based solution, preventing delays in transmissions of mission-critical or real-time traffic. Also extends this capability to the WAN. |
| Fast IP (NHRP-based shortcut routing) |
Alleviates router bottlenecks in today's any-to-any networks and intranets, where a growing percentage of traffic travels between rather than within subnets. |
| Efficient Multicast Control (using IEEE 802.1p GMRP) |
Prevents flooding of switched networks by multicast applications such as
video training, stock quotes, or online news. |
| Tivoli Management Agent | Provides central update and control capabilities transparent to the user, significantly reducing administration costs. 3Com has partnered with Tivoli Systems Inc. to deliver a simple, low-cost DynamicAccess software distribution application [summer 1998]. |
For non-technical questions or comments about the DynamicAccess software
version 1.5 product, please send e-mail to:
DA_Feedback@3com.com.
The installation for DynamicAccess software checks for the presence of other DynamicAccess software that you may have previously installed on the end node. If you have installed DynamicAccess software version 1.2 (Fast IP) or the dRMON SmartAgent® software, the installation procedure updates those modules and installs new features.
| DynamicAccess software version 1.5 does not bind to the Microsoft Dial-up Adapter, if present in the Network Control Panel icon. Only physical adapters can have the DynamicAccess software bindings. |
The basic tasks required to install the software are:
The DynamicAccess software installation process can be done at each end node or it can be done from a central location, eliminating the need to touch end node PCs. The DynamicAccess software must first be installed, and if you want to use settings other than the defaults, the software must also be configured.
The installation methods are:
Regardless of the method you choose to deploy DynamicAccess software, you need to expand the software file, run the installation software on an initial PC (for example, one of your administrative PCs), set the configuration options that you want for your network, and prepare the files for distribution. This initial installation and configuration process is the same one you would use for a local node installation.
To promote secure monitoring with dRMON, you must set a password for the dRMON DynamicAccess software. If you plan to implement the dRMON Edge Monitor System or have already done so at your site, you should have your password for the dRMON SmartAgent software recorded in a safe place. If you do not choose to set a password, the end node PCs will not communicate with the Edge Monitor.
| Do not install the DynamicAccess software version 1.5 on the PC where you installed or plan to install the Edge Monitor. The data reported by the Edge Monitor will be inaccurate because it will track its own traffic statistics twice. |
To set the password for secure monitoring with the dRMON Edge Monitor System using the DynamicAccess software:
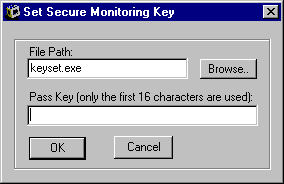
If you mistype the password, you can correct it and run the KEYSET.EXE file again from the login script if the end nodes have not been discovered by an Edge Monitor. If the end nodes have been adopted by an Edge Monitor, you can pause the Edge Monitor while you run the KEYSET.EXE file again from a login script to set the correct password.
| If you install DynamicAccess software on a PC running
Windows NT Server, the dRMON software that collects statistics is in a paused state.
To activate the dRMON collection, change the value of the following registry
REG_DWORD from 0 to 1 with Regedit: HKEY_LOCAL_MACHINE\System\CurrentControlSet\Services\DAPassThru<n>\Parameters\
where <n> is the instance of the virtual NIC. |
KEYSET.EXE only works with the DynamicAccess software, not with the dRMON SmartAgent software that you find on the Edge Monitor System product CD.
If you have previously distributed and configured a prior version of DynamicAccess software throughout your network, and you want to upgrade to version 1.5.4a, please observe the two tasks below. Although you are already familiar with the basic installation process:
To begin the installation of the DynamicAccess software, double-click the DA15INST.EXE file. You will see the following screens. During the distribution and installation process on each PC, the user also sees the same process.
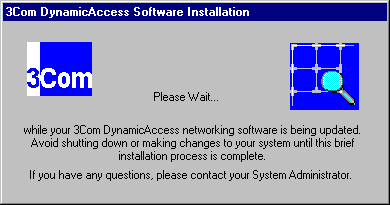
Because the DynamicAccess software installation causes the network protocol bindings to be reprocessed, the Bindings Status dialog box flashes until the process is complete.
If the PC is running Windows NT and neither you nor the user is logged on as a local administrator, the following message appears.
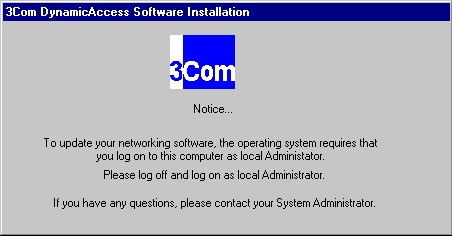
Log out and log on with local administrator rights to complete the installation.
When the installation is complete, you are asked to reboot.

Click OK.
You may be prompted to reboot more than once for the networking settings to apply properly. Follow the prompts to reboot.
After the DynamicAccess software is installed, the following changes are visible in the Network dialog box.
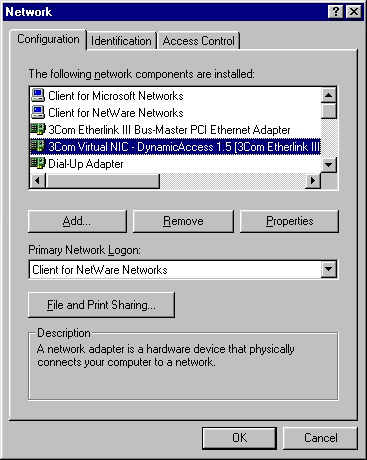
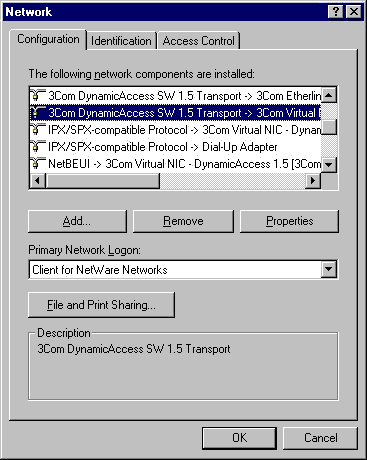
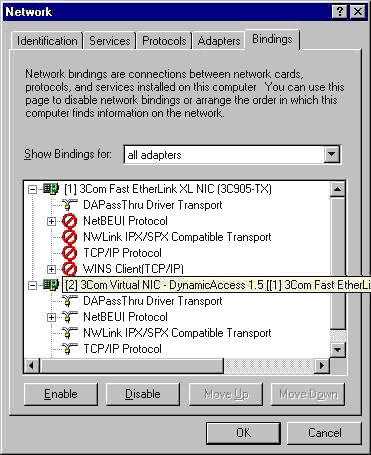
When you run the DA15INST.EXE file, the 3Com DynamicAccess Control Panel utility is installed as an icon in the Windows Control Panel.
Use this utility to set the DynamicAccess software options for the end nodes. You can configure DynamicAccess software settings two ways:
The 3Com DynamicAccess software Control Panel utility can be run locally unless you, the network administrator, disallow this capability. Local use of the utility can be prevented through a login script by changing the default Read/Write access setting to Read Only, using the .INI file you create and save with the DynamicAccess software utility.
If you have already set access to the DynamicAccess
Control Panel utility to Read Only on a PC and you need to temporarily enable READ WRITE
access to this utility, you can use the DA15CFG.EXE file found in the
<WINDOWS>\SYSTEM directory. In a DOS window, enter:
DA15CFG.EXE -READWRITE
The 3Com DynamicAccess Control Panel utility can then be used to alter any
setting.
To change access back to Read Only after you have modified some of the settings, in a
DOS window, enter:
DA15CFG.EXE -READONLY
Double-click the 3Com DynamicAccess Software icon to open the utility.
![]()
If you have more than one 3Com or non-3Com NIC in the PC, the DynamicAccess Control Panel utility configures NIC-specific parameters for the selected NIC only. All DynamicAccess software parameters can be set or modified remotely by running DA15CFG.EXE with an .INI file in a login script. Any settings specified through login scripts apply to all NICs in the PC, depending on the feature's requirements.
If there are multiple NICs in the end node PC when you open the 3Com DynamicAccess Control Panel utility, you can select which NIC to configure for the DynamicAccess software settings from the list in the Select Adapter dialog box.
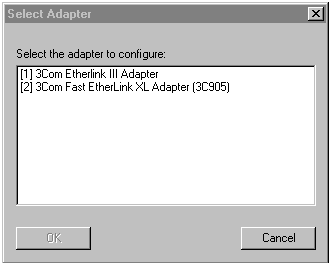
DynamicAccess software parameters are described in the next sections.
DynamicAccess software supports the emerging IEEE 802.1p/Q standard to provide Traffic Prioritization over Ethernet networks. The 802.1p standard allows up to eight levels of priority to be defined according to business needs. This is accomplished by looking in the packet at the specific IP port number of the application to be prioritized and applying the proper classification tag.
|
When implementing 802.1p-based features (i.e., 802.1p Traffic
Prioritization, 802.1p GMRP for Multicast Control, 802.1Q for VLAN ID and/or GVRP VLAN
registration), 3Com strongly recommends that you ensure that switches in the network are
also properly configured to support these features. Failure to do so may result in a
loss of connectivity between end systems. When using multicast-based applications,
check the Prioritize Multicast Traffic option. If you have end nodes without DynamicAccess software installed that communicate with other DynamicAccess software end nodes which use Traffic Prioritization and IPX, you need to place an 802.1Q-aware switch which is configured to remove 802.1Q tags in front of the non-DynamicAccess software nodes. Otherwise, you will lose connectivity between the two groups. |
The DynamicAccess Control Panel utility has an editable table that defines how applications are prioritized. Prioritization can ease bottlenecks in your network and allow critical applications to have network precedence. The Traffic Prioritization tab of the DynamicAccess Control Panel utility appears when you double-click the 3Com DynamicAccess Software icon.
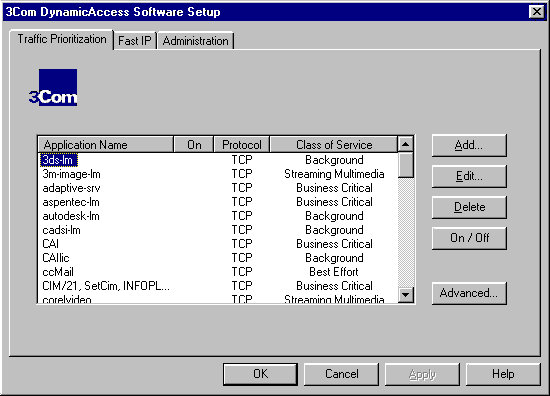
Some common applications and their priority assignments in terms of protocol (IPX, TCP, UDP), port/socket range, and suggested priority are already set for you in the Control Panel utility. The On/Off button enables or disables the prioritization of the selected application for your network. The enabled applications are denoted by the X in the On column. You can enable up to 32 applications per protocol for a total of 96 applications. To add any application that you use at your site, click the Add button.
When you click the Add button, the following dialog box appears for you to create a definition for the application you want to add. Insert the name of your application, specify the protocol it uses, enter the port or socket range in decimal format, and assign it a class of service priority. If you need to change any information about an application you have already added, select the application and click Edit to open this dialog box.
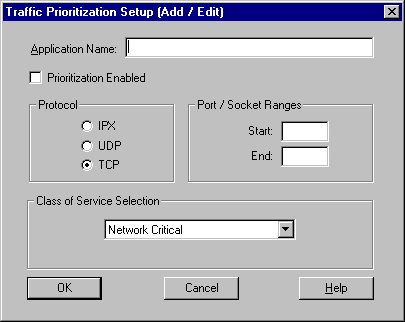
Some applications support multiple protocols and use different port or socket ranges for each protocol. If the application in question uses multiple protocols, you must create a definition for each protocol. The range and protocol must match those on your network. For example, if TCP/IP is installed on your network, do not enter the socket range for the IPX protocol. Use the range for TCP/IP. If you inadvertently enter the wrong port values or protocol, whatever application is operating at that port range will be prioritized, not the application you intended.
Note: Be sure that you enter the port range that corresponds to the specified protocol.
Traffic prioritization operates by watching the packets that are sent through a specified port range. If you add multiple applications that are on the same protocol and port range, you must specify the same priority for that group of applications. If you try to specify a different priority for one of those applications, only the priority specified first is used. For example, if you define the following:
| Application | Protocol | Port/Socket Range | Class of Service |
| Application 1 | TCP |
80 |
Network Critical |
| Application 2 | TCP |
80 |
Standard |
Application 2 will not be prioritized as defined, but is prioritized according to the definition for Application 1.
For additional information about port ranges, click any of the links below.
http://www.isi.edu/in-notes/iana/assignments/port-numbers
http://www.con.wesleyan.edu/~triemer/network/regports.html
http://www.chebucto.ns.ca/~rakerman/port-table.html
http://developer.novell.com/engsup/sample/tids/dsoc1a/dsoc1a.htm
http://developer.novell.com/engsup/sample/tids/dsoc1b/dsoc1b.htm
When you click the Advanced button, the Advanced dialog box of the Traffic Prioritization tab appears. In the Advanced panel, you can set options globally and define your own classes for Class of Service support. The Priority Support check box allows you to enable or disable global support for the service specified by the additional check boxes. If the Priority Support check box is not selected, none of the classes associated with PACE, the IEEE 802.1p/Q standard for switches, nor the IP Type of Service is enabled. If any of the boxes are checked, then that service is enabled.
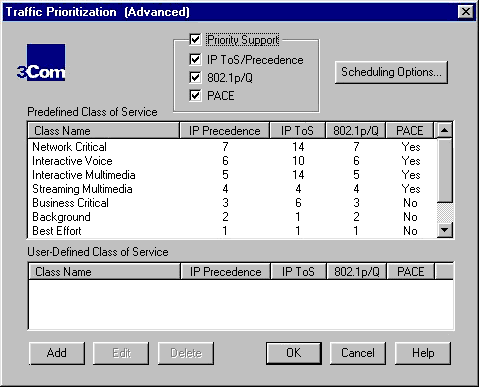
In the Predefined Class of Service list, the highest priority is Network Critical which has a value of 7.
The following classes are the default Class of Service options available to use for classifying applications from the DynamicAccess Control Panel utility:
Class of Service |
IP Precedence | IP Type of Service | 802.1p/Q Priority | PACE Enabled? |
|||
Value |
Default |
Value |
Default |
Value | Default | ||
| Network Critical | 7 | Enabled | 14 | Enabled | 7 | Enabled | Yes |
| Interactive Voice | 6 | Enabled | 10 | Enabled | 6 | Enabled | Yes |
| Interactive Multimedia | 5 | Enabled | 14 | Enabled | 5 | Enabled | Yes |
| Streaming Multimedia | 4 | Enabled | 4 | Enabled | 4 | Enabled | Yes |
| Business Critical | 3 | Enabled | 6 | Enabled | 3 | Enabled | No |
| Background | 2 | Enabled | 1 | Enabled | 2 | Enabled | No |
| Best Effort | 1 | Enabled | 1 | Enabled | 1 | Enabled | No |
| Standard | 0 | Disabled | 1* | Enabled | 0 | Disabled | No |
| OFF | No | Disabled | No | Disabled | No | Disabled | No |
For ToS, the value of 1 means that packets are sent with minimum monetary costs.
The Default value of Enabled or Disabled for 802.1p means "tagged" or "not tagged." The Default value of Enabled for IP ToS means the priority in the IP header is changed. If the Type of Service is disabled, no changes are made to the IP header. These predefined classes cannot be edited.
You can add a new class, or edit or delete any selected item in the user-defined list of classes. Click the Add button, or double-click the item to open the User-Defined Class of Service (Add/Edit) dialog box.
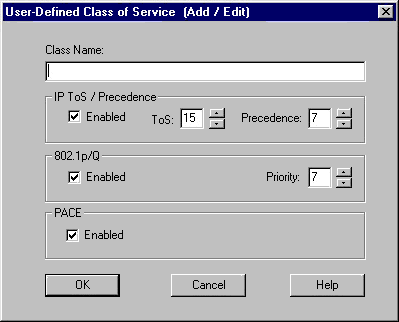
This dialog box allows you to define a class specific to your needs for your network. The Internet Engineering Task Force (IETF) is still considering the practical interpretation of the IP Type of Service (ToS) values. (For details, refer to IETF RFC 791 "Internet Protocol, DARPA Internet Program Protocol Specification," Sept. 1981, and RFC 1349 "Type of Service in the Internet Protocol Suite," P. Almqist, July 1992.) Therefore, if the values you specify here need changing, you can always edit them. The Traffic Prioritization, or 802.1p/Q, support and priority are also assigned when you define new classes.
You can specify the settings for various scheduling options and Fast IP independently using the two associated dialog boxes.
To open the Scheduling Options dialog box, click the Scheduling Options button in the Traffic Prioritization (Advanced) dialog box.
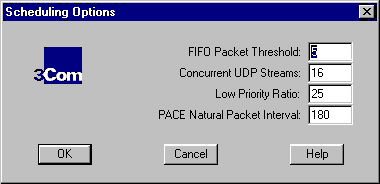
The following advanced values can be modified to regulate traffic on the network.
| Option | Range | Default | Function |
| FIFO Packet Threshold |
1-255 | 5 | Controls the number of low-priority packets that the network driver allows in the FIFO ahead of PACE packets. A smaller number decreases the time between PACE packets, thus improving high-priority traffic performance and simultaneously decreasing low-priority traffic performance. The recommended setting is 5. |
| Concurrent UDP Streams | 64 | 16 | Controls the number of simultaneous multimedia UDP packet streams that the
network driver can handle at any given time. For many applications, the number of UDP
streams is the same as the number of connections. For example, a videoconference with three people at three different sites uses three concurrent UDP streams for the video data. The concurrent UDP streams setting must be a power of 2 (2, 4, 8, 16, and so forth), but the optimal value varies depending on your PC and the application that you are running. Although a video server can support up to 32 connections, a client may only want to conference with four other people at a time. Any changes to this setting take effect after rebooting. The recommended setting is 16. |
| Low-Priority Ratio | 1-255 | 25 | When traffic prioritization support is enabled, high-priority packets are
always transmitted before low-priority packets. If a high-priority application sends
out a sufficiently high number of high-priority packets, low-priority packets may not be
sent. To prevent this problem, the driver uses a ratio setting to periodically send out a low-priority packet (if one is waiting to be sent). For example, if a value of 20 is entered, one low-priority packet would be sent for every 20 high-priority packets. The recommended setting is 25. |
| PACE Natural Packet Interval | 30-300 | 180 | To communicate packet priority to interconnect devices (repeaters, switches, and the like), the PACE driver slightly modifies the Ethernet packet. Because of this, connection problems may result when these modified packets are sent out for long periods during which no low-priority packets are sent. To get around this problem, the driver can be configured to send out an unaltered, natural packet periodically. The recommended setting is 180 seconds. |
The default setting for Fast IP is Off. Fast IP settings are installed with default values. When Fast IP is turned on, the defaults apply. You enable Fast IP using the 3Com DynamicAccess Control Panel utility. Other advanced parameters, such as the number of packets before initiating a Fast IP cut-through request and aging time for the cache table, are also set using this Fast IP tab.
Fast IP technology relies upon the concept of "open" VLANs. Open VLANs allow communication between VLANs. If the switches in the network have been configured to implement "closed" VLANs where communication between VLANs is not allowed, Fast IP will not function and the normal routed path will be used. A network that has both open and closed VLANs can experience problems, such as a loss of connectivity. To avoid this problem, refer to the switch product documentation or consult your switch vendor(s) to ensure the switch supports open VLANs. If you must have a mixed switch environment, Fast IP should be disabled.

Enter the values in decimal format.
| Fast IP Settings | Default | Range | Function |
| Enabled | Off | N/A | Turns Fast IP on or off. |
| Lease Time | 300 | 0 - 4294967294 or 0xFFFFFFFE |
Sets the period in seconds that a Fast IP cut-through remains functioning once established, specified in decimal format. |
| Cut-through Threshold | 5 | 0 - 4294967294 or 0xFFFFFFFE |
Sets the number of packets allowed to travel before a Fast IP cut-through is created, specified in decimal format. |
The settings available in the Administration tab are unlikely to change frequently once you have established using DynamicAccess software on your network. The additional networking settings are VLAN Tagging and Efficient Multicast enablement.
Efficient Multicast
Efficient Multicast is used to relieve network congestion that arises when large amounts of multicast traffic exist. Many distance learning, collaborative computing, and desktop video-conferencing applications use multicasts to convey data.
Efficient Multicast allows NICs to work with switches that comply with the IEEE 802.1p
Group Multicast Registration Protocol (GMRP) specification, so that the NICs can register
for multicast group membership. This membership means that multicast traffic can be
filtered to only those segments that need to be part of the multicast group. In
order for Efficient Multicast to operate correctly, your network must incorporate switches
that comply with the IEEE 802.1p (GMRP) standard. If a particular switch does not
understand GMRP, it simply treats the packet like any other and no side effects occur.
GMRP is disabled by default. 3Com recommends you verify your switches' capabilities and
that their configuration is set up for GMRP.
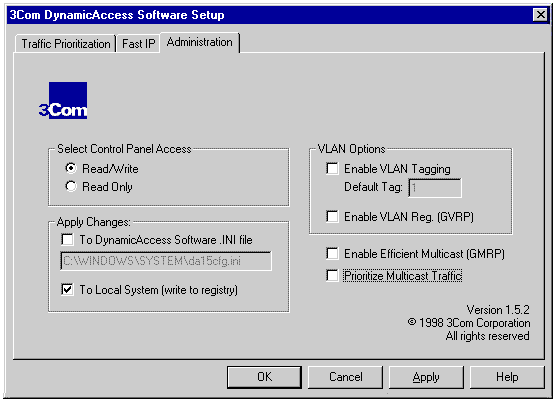
VLAN Registration (Group VLAN Registration Protocol [GVRP])
VLAN (Virtual LAN) Registration is very similar to Efficient Multicast. Instead of registering for multicast traffic, VLAN registration enables the end node to tell the 802.1Q-aware switch which VLAN traffic to send to the end node.
For VLAN Registration to operate correctly, your network must incorporate 802.1Q-compliant switches. GVRP is disabled be default. 3Com recommends you verify your switches' capabilities and that their configuration is set up for GVRP.
Default VLAN Tag
If your network has VLANs enabled and requires that a particular end node should have a VLAN tag in its network traffic, select the Enabled check box to enable the tag. Specify the tag in the Default Tag field in decimal format within the range of 0 - 4095. If VLAN tagging is enabled, all traffic from this end node has an 802.1Q tag. The default tag value is 1.
Select this box if you want to assign priority to all your multicast traffic. If you experience any connectivity problems after selecting this feature, one or more of your 802.1p/Q switches may be misconfigured.
Setting Control Panel Access
The 3Com DynamicAccess software Control Panel utility can be run locally if the Local Read/Write Access button is selected. If the Local Read Only button is selected, none of the settings in the utility can be changed. As network administrator you can disallow any changes by setting access setting to Read Only when you save .INI file you create and save with the DynamicAccess software utility.
Saving Settings to a .INI File
After you have established the Traffic Prioritization and other settings, you can save those settings, and any additional ones you set in the Administration tab, to a file that you specify by selecting the Create DynamicAccess Software .INI file check box in the Apply Changes To area. This file, which has an .INI file format, is used with DA15CFG.EXE to pass those site-specific settings to the end node PCs in your network through a login script or if DA15CFG.EXE is run locally.
| Do not edit the .INI file directly to avoid inserting syntax errors that may prevent the file from being used properly. |
If you want to apply your changes to your local PC, select the Local System (write to registry) check box. You can have either or both check boxes selected.
| Be sure to leave the Local System (write to registry) check box CLEAR if you just want to create the .INI file and not change the local settings. You may inadvertently lock yourself out of the Control Panel utility if you have applied Local Read Only Access. If you need to enable the 3Com Control Panel utility again, click here for instructions. |
If you have established the DynamicAccess software settings for Traffic Prioritization and Fast IP and now, from your network administrative PC, you want to finalize the settings that will be distributed across your network, 3Com recommends you restrict access to the 3Com DynamicAccess Control Panel utility on the local end nodes by clicking the Local Read Only Access button before you export your settings to YOURFILE.INI.
Apply Changes Locally
To apply the new configuration settings to the local PC you are working on, select the Local System check box.
The DynamicAccess software installation program detects whether you have previously installed any DynamicAccess software or the dRMON SmartAgent software on a PC. If previous software versions are detected, the installation program removes them and then installs version 1.5. Because the installation program checks for the presence of the current DynamicAccess software, any subsequent time end users log on to the network, the installation program does not reinstall DynamicAccess software.
Any configuration settings that you distribute through the login script by running DA15CFG.EXE take precedence over any settings that may be specified locally at the end node. Therefore, you should not leave the installation and configuration files in your login script files any longer than you need to be satisfied that each end node has completed the installation.
When you run the DynamicAccess installation files from a login script on
end node PCs running Windows NT 3.51, 3Com suggests you ensure that the login script is
run synchronously. 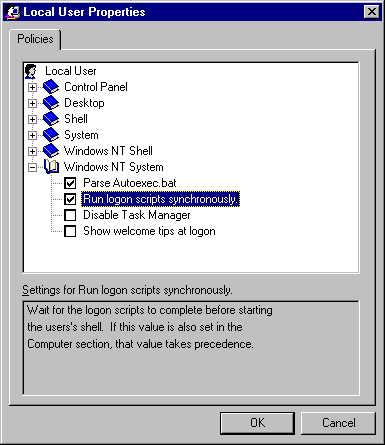 |
For NetWare, use the NetAdmin tool to modify a login script to include the DynamicAccess files.
For Windows NT networks, add a batch file that contains the following lines, with the .INI file you created with the DynamicAccess software Control Panel utility. Use the "User Manager for Domain" to add this batch file to the login script.
PATH=%windir%\system;%windir%\system32
da15cfg.exe -F <full path> YOURFILE.INI
You can have your users copy and run the DA15INST.EXE file themselves on their PCs. In this case, the basic installation instructions you can give to your users are as follows:
Be sure to inform your users about the benefits of the upgraded networking software. You could use the suggested Administrative Bulletin included with these instructions.
When you install the DynamicAccess software, an endpoint agent, called the LCF endpoint, from Tivoli, Inc. is copied to the end node PC in the directory: c:\tivoli\lcf. These files include the actual code (lcfd, the daemon code), and the libraries needed for the LCF endpoint. Click here for instructions.
If you need to remove the DynamicAccess software from a PC, the process that you use depends on the operating system. If you have more than one NIC in the PC, additional considerations apply. The PC must be restarted for the changes to take effect.
For Windows NT, you:
For Windows 95, you have two methods. The first method uses the Start button.
The file named DAW95RMV.EXE is in the <Windows>\System directory.
The second method uses the Add/Remove Programs icon in the Control Panel.
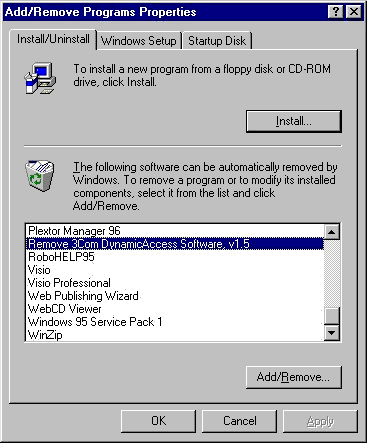
| In Windows 95, if the 3Com DynamicAccess Control Panel utility is set to Read Only, you cannot remove the DynamicAccess software. You must change the access to Read Write and then remove DynamicAccess software. |
When you have DynamicAccess software installed on more than one NIC in a PC, use either of the above methods for removing DynamicAccess software.
If you attempt an improper removal and network connections appear to be broken, you must run DAW95RMV.EXE to complete the clean up. After you run DAW95RMV.EXE, you can reinstall DynamicAccess software.
| Your network connections will break if you select the DA
Transport protocols from either the Virtual NIC or the real NIC and click Remove. You must run DAW95RMV.EXE to complete the clean up. |
At the time of product release, 3Com compiled the following recommendations for specific circumstances when you use DynamicAccess software.
| If you need to update your NIC driver any time after you have DynamicAccess software installed, be sure to restart the PC, even if you do not see a prompt to reboot. The DynamicAccess software will restore your DynamicAccess software settings to the new driver upon rebooting. |
| If you have installed DynamicAccess software on a PC
running Windows NT and you add the TCP/IP protocol, you need to configure the real NIC
with the IP address and other settings, not the DynamicAccess software virtual
NIC. Because Windows NT requires IP settings for each NIC before closing the Network dialog box, enter "dummy" values for the DynamicAccess software virtual NIC. Upon closing the Network dialog box, the DynamicAccess software will restore all bindings and use the IP settings you specified for the real NIC. |
| If you use the dRMON Edge Monitor System with DynamicAccess
software version 1.5, remember that the dRMON client software only collects data from the
first 3Com NIC in the PC. If you want to have the dRMON client software collect data from a different NIC in that PC, you need to move that NIC to be the first 3Com NIC visible in the Network dialog box. |
| Click here for a detailed description about understanding IP port ranges. |
| If you use a 3C509 EtherLink III NIC in a 233-MHz Pentium ALR®
Optima 2 system running Windows NT, 3Com recommends that you disable Plug-and-Play (PnP)
mode on the NIC if you see a message that the adapter did not start after you install
DynamicAccess software. Use the DOS window and the EtherDisk to disable PnP. Insert the EtherDisk into the floppy drive (for example, drive A:). At the DOS prompt, enter When the batch file is finished, restart your PC and verify your network connections. |
| If you plan to use a 3C589A EtherLink III LAN PC Card NIC with the dRMON software module, please contact 3Com Technical Support for details. | |
| If you add an additional NIC to a PC running Windows NT and Internet Information Server (IIS) version 3.0 and DynamicAccess software is installed, the operating system prompts you to reboot. If you click Yes, and the PC reboots, IIS may not start automatically. You need to reboot one more time to restart IIS. |
3Com offers technical support for DynamicAccess software version 1.5 by telephone or online on the 3Com Web site.
Support for 3Com NICs
Technical support is available to customers using DynamicAccess software version 1.5 on 3Com NICs by calling 1-800-NET-3COM (800-876-3266) option 3, option 2.
Support for non-3Com NICs
DynamicAccess software version 1.5 has been tested on the following non-3Com NICs: Intel, Adaptec, and SMC. DynamicAccess software version 1.5 can be used on non-3Com NICs according to the list of available features.
In the United States, technical support is available to customers using DynamicAccess software version 1.5 on non-3Com NICs by calling 1-800-NET-3COM (800-876-3266) option 2, option 7. Enter access number 205930 for time and materials. Hours are from 6:00 a.m. to 5:00 p.m. PST. Charges are $150.00 per hour with a 30-minute minimum. Payable by MasterCard or Visa.
Support is available in APR and Europe via e-mail and is on a best-effort basis.
For support in APR (except Japan), send e-mail to: APR_Technical_Support@3Com.com.
For support in Japan, send e-mail to: APR_Technical_Support@JP.3Com.com.
For support in Europe, send e-mail to: European_Technical_Support@3com.com.
Online Support
3Com also recommends that you check the corporate Web site periodically for FAQ's and updates for your software at:
http://support.3com.com/index.htm
For non-technical questions or comments about the DynamicAccess software
version 1.5 product, please send e-mail to:
DA_Feedback@3com.com .
Copyright ©1998, 3Com Corporation.
Unless otherwise indicated, 3Com registered trademarks are registered in the United States
and may or may not be registered in other countries. 3Com, DynamicAccess,
EtherDisk, EtherLink, LinkBuilder, OnCore, SmartAgent, and SuperStack are registered
trademarks of 3Com Corporation. CoreBuilder and PACE are trademarks of 3Com Corporation.
ALR is a registered trademark of Advanced Logic Research, Inc. Vines is a registered trademark of Banyan Systems, Inc. ClearQuality and ClearSupport are registered trademarks of Clarify, Inc. Intel, LANDesk, and Pentium are registered trademarks of Intel Corporation. LinkLogic is a trademark of MedicaLogic, Inc. PowerTrak is a trademark of Medicode, Inc. Windows and Windows NT are registered trademarks of Microsoft Corporation. 3M is a registered trademark of Minnesota Mining and Manufacturing Company. NetWare is a registered trademark of Novell, Inc. SQL*Net is a registered trademark of Oracle Corporation. PeopleSoft is a registered trademark of PeopleSoft, Inc. Action Request System is a registered trademark of Remedy Corporation. SupportTEAM is a registered trademark of Scopus Technology, Inc. SQLServer is a trademark of Sybase, Inc. Tivoli is a registered trademark of Tivoli Systems Inc. Other brand and product names may be registered trademarks or trademarks of their respective holders.